TCP Client/Server Application Framework
for Android, iOS, Windows Phone, Windows, Mac and Java Clients
Introduction
This blog showcases the open source project I created called DotNetOpenServer SDK. The SDK provides a client/server application framework that implements an extendable binary protocol stack, supports SSL/TLS 1.2 connections, includes an extendable security framework, includes a keep-alive/heartbeat protocol and includes a C# API for Windows and Windows Mobile, a Java API for Android and Unix/Linux flavors and an Objective-C API for iOS and Mac.
Although not discussed in this blog, my commercial product, DotNetCloudServer SDK, which is built on top of the DotNetOpenServer, includes support for remote method invocation (RMI), variable subscriptions and event notifications.
What this Article Is and Is Not
There are already many articles on the Internet that show developers how to create both synchronous and asynchronous TCP client/server applications. This blog does not attempt to recreate what has already been done so well. Instead this blog provides a high level overview of the framework, details the framework's binary protocol stack, summarizes how to extend the framework with protocol implementations, summarizes how to create your own authentication protocol and provides a detailed tutorial to create your own client/server application.
Links and 3rd Party References
-
The complete source code for the DotNetOpenServer along with the samples created in this blog can be downloaded from GitHub here:
https://github.com/UpperSetting/DotNetOpenServerSDK -
The Windows binaries can be downloaded from NuGet. For more information see the README.md located on GitHub here:
https://github.com/UpperSetting/DotNetOpenServerSDK/blob/master/README.md -
The Java JAR files and Objective-C source code can be downloaded from GitHub here:
https://github.com/UpperSetting/DotNetOpenServerSDK/releases -
The Windows server and client optionally support logging through log4Net which can be downloaded from NuGet here:
https://www.nuget.org/packages/log4net/ -
To minimize the code base I auto-generated the Objective-C API from my Java source code using the J2ObjC open source project (http://j2objc.org/). At this time the J2ObjC open source project does not yet support SSL/TLS 1.2 but, according to the project owner, it is being worked on and should be released in the near future.
-
The documentation for the DotNetOpenServer is located here:
http://www.UpperSetting.com/docs/DotNetOpenServerSDK
Architecture
DotNetOpenServer is implemented on Windows using the .Net Framework 4.5.2. The server is implemented as an asynchronous TCP socket server. .Net components are used to negotiate SSL/TLS 1.2. Protocols are implemented in stand-alone assemblies which, when requested by the client, are loaded using Reflection. The information required for the server to load the assemblies is contained within the app.config file or can optionally be programatically set.
Projects
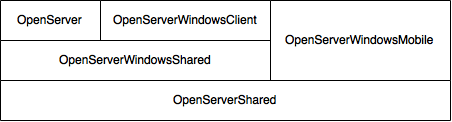
When I built this API my goal was to minimize duplicate code as much as possible. What I ended up with was several solutions and even more projects. At the lowest level is a Portable project called OpenServerShared that is shared by the server, Windows client and Windows Mobile client. Next lies a Windows project called OpenServerWindowsShared that is shared between the server and Windows client. Finally, there is a project for the server, Windows client and Windows Mobile client.
Since Android applications are written in Java and I wanted to support Unix and Linux flavors I was able to further minimize code duplication. Using Eclipse, I was able to create a single Java project responsible for generating JAR files that can be used by both Android and Unix/Linux applications.
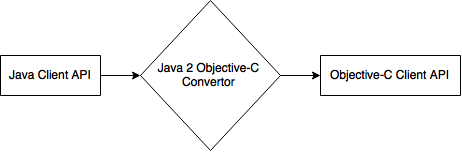
For those of you that are unfamiliar with programming on Apple operating systems, iOS (iPhone and iPad) and OSx (Mac) applications are written in Objective-C or Swift. When I started this project I did not know the Objective-C or Swift languages so I researched auto-generation options. I was pleasantly surprised to learn about the J2ObjC project and ever more presently surprised to find all of the code, except the SSL/TLS methods, not only ported without issue but executed flawlessly. Again, I was able to minimize code duplication. Moving forward, once a good Java to Swift converter becomes available I plan on including a Swift API as well.
Fast and Efficient
Since a core requirement of this project was to create a protocol stack that executed quickly and efficiently I'm going to start out detailing the protocol stack. If you are not interested in the byte streams, go ahead and skip this section.
Session Layer Protocol (SLP)
The Session Layer Protocol (SLP) is the first protocol in the stack. SLP is a very simple protocol that transmits 6 bytes of data. The first field contains a 2 byte identification number. Although the identification number is technically not necessary, I felt it was a good addition for sniffing TCP packets that contain multiple DotNetOpenServer packets. On a personal note, the identification number is 21843 or 0x5553 transmitted in little endian this is 0x53 0x55. I chose this number because it stands for US in ASCII which is the acronym for my company's name (Upper Setting). The next field contains a 4 byte Uint32 that specifies the length of the payload in bytes. The last field contains a 2 byte Uint16 that specifies the next layer's unique protocol identifier. This last field is included in the payload length. Also worth noting here, all integer data types are transmitted in little endian (least significant digit first).
For illustration purposes, here's what a packet would look like that is transmitting 3 bytes of data for a protocol that identifies itself as 0x0B0A and has a payload of one byte with the value of 0xFF:
53 55 03 00 00 00 0A 0B FF
Capabilities Protocol (CAP)
DotNetOpenServer includes an internal Capabilities Protocol (CAP) that enables client applications to query the server for a list of supported protocols. Also worth noting, if a client attempts to initialize a protocol that is not supported, the server returns the error through CAP. CAP's unique protocol identifier is 0x0000. The first byte after the protocol identifier contains the command value.
|
Command |
Value |
Type |
Description |
|
GET_PROTOCOL_IDS |
0X01 |
Request |
Sent by clients to get a list of server supported protocol IDs. |
|
PROTOCOL_IDS |
0X02 |
Response |
Sent by the server in response to a GET_PROTOCOL_ID command. |
|
ERROR |
0xFF |
Response |
Sent by the server when the client requests a protocol that is not supported by the server. |
Here's what a GET_PROTOCOL_IDS command looks like:
53 55 03 00 00 00 00 00 01
Here's what a sample response looks like:
53 55 0D 00 00 00 00 00 02 03 00 00 00 01 00 02 00 0A 00
The response payload contains an Uint32 that contains the number of supported protocols followed by each protocol's identifier. In this case 3 protocols are supported: 1, 2, and 10. In Hex that's 0x0001, 0x0002 and 0x000A.
Keep-Alive Protocol (KAP)
DotNetOpenServer includes a Keep-Alive Protocol (KAP) which can optionally be enabled or disabled. The purpose of this protocol is three-fold. First, the server was implemented to drop inactive connections. KAP keeps the connection alive by sending very small packets back and forth. Secondly, since KAP is sending and receiving packets it is able to identify idle or broken connections thus enabling both ends to close broken connections, free resources and notify the client application when a network failure occurs. Lastly, KAP includes a QUIT command enabling both ends to notify the other prior to terminating the session enabling resources to be freed in a timely fashion. If enabled, KAP is automatic and does not require nor offer any external methods. KAP's unique protocol identifier is 0x0001 The first byte after the protocol identifier contains the command value.
|
Command |
Value |
Description |
|
KEEP_ALIVE |
0X01 |
Sent by both the client and server to keep an idle session open. |
|
QUIT |
0xFF |
Sent by both the client and server to provide notification to the end point the session is closing. |
Here's what a KEEP-ALIVE command looks like:
53 55 03 00 00 00 01 00 01
Extendable
I designed DotNetOpenServer so protocols can easily be added by developers at any time in the future without the need to recompile or redeploy the server. This is accomplished using Reflection. In other words, developers can create and install their protocols to pre-existing deployments of the server. Protocols are implemented by simply creating a .Net Assembly or JAR file that contains a class that is derived from the ProtocolBase class. Typically you create a class for the server-side and another class for the client-side. Once implemented, you can either configure the server to load the protocol using the app.config file or you can programatically configure the server. Finally, update your client applications to use your protocol.
The SDK contains a detailed tutorial that steps you through the process of creating a server-side side protocol as well as a client-side protocols for each of the supported platforms. The tutorials can be found here:
http://www.UpperSetting.com/docs/DotNetOpenServerSDK/html/CreatingProtocols.htm
Security
A client/server framework wouldn't be complete without security. Included in the SDK is a Windows Authentication Protocol, however; you can create and add as many authentication protocols as required. For example, the server can host a protocol that authenticates users through Facebook as well as a protocol that authenticates users through a proprietary corporate database. CAP, as mentioned above, enables client-side users the option to choose the authentication protocol.
Authentication Protocols are implemented by simply creating a .Net Assembly or JAR file that contains a class that is derived from the AuthenticationProtocolBase class. Create a class for the server-side then implement your authentication method. Next, create a .Net and/or Java class that remotely calls your authentication method. If your authentication methods supports roles and/or groups, and you want to check role membership from other protocols, override the IsInRole method within your server-side implementation. If you plan on creating your own authentication method, as a starting point, I suggest reviewing the Windows Authentication Protocol source code located here:
https://github.com/UpperSetting/DotNetOpenServerSDK/tree/master/Protocols/WinAuth
Any protocols you create can build on top of the security model by including their own authorization functions. Protocol implementations can access the calling client's username through the ProtocolBase.Session.AuthenticationProtocol property. The returned object, an instance of AuthenticationProtocolBase, offers a UserName property and, as mentioned above, an IsInRole(string role) method. I've used these APIs in the DotNetCloudServer's Remote Object Access Protocol to provide execute permissions to methods, read/write permissions to variables and read (or subscribe) permissions to events.
Putting it all Together
Creating a Server Application
Creating a sample server application is very simple.
First, create a .Net 4.5.2 Console Application.
Next, add the DotNetOpenServer assemblies. To add the assemblies, open the NuGet Package Manager Console then type the following commands:
PM> Install-Package UpperSetting.OpenServer
PM> Install-Package UpperSetting.OpenServer.Protocols.KeepAlive
PM> Install-Package UpperSetting.OpenServer.Protocols.WinAuth.Server
PM> Install-Package UpperSetting.OpenServer.Protocols.Hello.Server
PM> Install-Package log4net
The 'UpperSetting.OpenServer' package contains the server.
The 'UpperSetting.OpenServer.Protocols.KeepAlive' package contains both the server and client Keep-Alive protocol implementations.
The 'UpperSetting.OpenServer.Protocols.WinAuth.Server' package contains the server-side Windows Authentication protocol implementation.
The 'UpperSetting.OpenServer.Protocols.Hello.Server' package contains a sample protocol that simply echos a hello message back to the client.
The 'log4net' package contains the Apache log4net assemblies enabling you to log messages using log4net.
As previously mentioned, the server can be configured using either the app.conifg file or programatically. Both methods are fairly simple.
To create an instance of the server using the app.config
First, add the code to create the server. When using the app.config to configure the server the application code required to start the server is very simple. Simply create an instance of US.OpenServer.Server. When your application is ready to shutdown, call the Server.Close method. For example:
using System;
using US.OpenServer;
namespace HelloServer
{
    class Program
    {
        static void Main(string[] args)
        {
            Server server = new Server();
            server.Logger.Log(Level.Info, "Press any key to quit.");
            Console.ReadKey();
            server.Close();
        }
    }
}
Next, add the configuration to the app.config file. 3 sections are required: log4net, server and protocols. Once added to the 'configSections' element, each section must be implemented.
The 'log4net' Section
The log4net section is extensive and outside the scope of this blog. For more information please see the Apache log4net website.
The 'server' Section
The 'server' section contains the following elements:
|
Element/Attribute |
Description |
|
host |
The IP address to bind the TCP socket server. Defaults to 0.0.0.0 (all IP addresses). |
|
port |
The TCP port to run the server. Defaults to 21843. |
|
tls |
True to enable SSL/TLS 1.2, otherwise False. Defaults to False. |
|
tls/certificate |
The X509Certificate used to authenticate. |
|
tls/requireRemoteCertificate |
True to require the end point to supply a certificate for authentication, otherwise False. |
|
tls/allowSelfSignedCertificate |
True to enable self-signed certificates, otherwise False. |
|
tls/checkCertificateRevocation |
True to check the certificate revocation list during authentication, otherwise False. |
|
tls/allowCertificateChainErrors |
True to check the certificate chain during authentication, otherwise False. |
|
idleTimeout |
The number of seconds a connection can remain idle before the connection is automatically closed. Defaults to 300 seconds. |
|
receiveTimeout |
The number of seconds a receive operation blocks waiting for data. Defaults to 120 seconds. |
|
sendTimeout |
The number of seconds a send operation blocks waiting for data. Defaults to 120 seconds. |
For example:
<server>
    <host value="0.0.0.0" />
    <port value="21843" />
    <tls value="true"
         certificate="UpperSetting.com"
         requireRemoteCertificate="false"
         allowSelfSignedCertificate="false"
         checkCertificateRevocation="true"
         allowCertificateChainErrors="false"/>
    <idleTimeout value="300" />
    <receiveTimeout value="120" />
    <sendTimeout value="120" />
</server>
The 'protocols' Section
The 'protocols' section contains an array of 'item' elements. Each 'item' element contains 4 attributes which I've defined in the table below:
|
Attribute |
Description |
|
id |
A Uint16 that specifies the unique protocol identifier. |
|
assembly |
A String that specifies the assembly the protocol is implemented. |
|
classPath |
A String that specifies the class path of the class the protocol is implemented. |
|
configClassPath |
A String that specifies the class path of the class the protocol configuration reader is implemented. |
For example:
<protocols>
    <item id="1"
          assembly="US.OpenServer.Protocols.KeepAlive.dll"
          classPath="US.OpenServer.Protocols.KeepAlive.KeepAliveProtocol" />
    <item id="2"
          assembly="US.OpenServer.Protocols.WinAuth.Server.dll"
          classPath="US.OpenServer.Protocols.WinAuth.WinAuthProtocolServer"
          configClassPath="US.OpenServer.Protocols.WinAuth.WinAuthProtocolConfigurationServer">
        <permissions>
            <roles>
                <role value="Administrators" />
            </roles>
            <users>
                <user value="TestUser" />
            </users>
        </permissions>
    </item>
    <item id="10"
          assembly="US.OpenServer.Protocols.Hello.Server.dll"
          classPath="US.OpenServer.Protocols.Hello.HelloProtocolServer" />
</protocols>
A complete app.config sample can be found here:
http://UpperSetting.com/docs/DotNetOpenServerSDK/html/Configuration.Windows.app.config.htm
Finally, compile and run.
To create an instance of the server programatically
First, add the code to create the server. From the Main function, create a US.OpenServer.Configuration.ServerConfiguration object then set any properties you want to override including SSL/TLS properties.
ServerConfiguration cfg = new ServerConfiguration();
cfg.TlsConfiguration.Enabled = true;
cfg.TlsConfiguration.Certificate = "UpperSetting.com";
Next, create a US.OpenServer.Protocols.WinAuth.WinAuthProtocolConfigurationServer object then add the groups and users you want to authorize access.
WinAuthProtocolConfigurationServer winAuthCfg = new WinAuthProtocolConfigurationServer();
winAuthCfg.AddRole("Administrators");
winAuthCfg.AddUser("TestUser");
Next, create a Dictionary of US.OpenServer.Protocols.ProtocolConfiguration objects keyed by the unique protocol identifier that contains the following three protocols:
-
US.OpenServer.Protocols.WinAuth.WinAuthProtocolServer
-
US.OpenServer.Protocols.KeepAlive.KeepAliveProtocol
-
US.OpenServer.Protocols.Hello.HelloProtocol
Dictionary<ushort, ProtocolConfiguration> protocolConfigurations =
    new Dictionary<ushort, ProtocolConfiguration>();
protocolConfigurations.Add(WinAuthProtocol.PROTOCOL_IDENTIFIER, winAuthCfg);
protocolConfigurations.Add(KeepAliveProtocol.PROTOCOL_IDENTIFIER,
    new ProtocolConfiguration(KeepAliveProtocol.PROTOCOL_IDENTIFIER, typeof(KeepAliveProtocol)));
protocolConfigurations.Add(HelloProtocol.PROTOCOL_IDENTIFIER,
    new ProtocolConfiguration(HelloProtocol.PROTOCOL_IDENTIFIER, typeof(HelloProtocolServer)));
Next, create the US.OpenServer.Server passing in the ServerConfiguration and the the Dictionary of ProtocolConfiguration objects.
Server server = new Server(cfg, protocolConfigurations);
Finally, when your application is ready to shutdown, call Server.Close().
server.Close();
The complete source code for this sample application can be found here:
https://github.com/UpperSetting/DotNetOpenServerSDK/tree/master/Samples/Windows/HelloServer
Creating Client Applications
As I mentioned in the introduction, I wanted to include an API for Android, iOS, Windows Phone, Windows, Mac and Java clients. In an effort to keep this blog as short as possible I will only show you how to create a Windows client, however; the DotNetOpenServer SDK includes APIs and tutorials for each of the platforms located here:
http://UpperSetting.com/docs/DotNetOpenServerSDK/html/ClientSideComponents.htm
To create a Windows client-side
Creating a sample client application is very simple.
Step 1: Create a .Net 4.5.2 Console Application.
Step 2: Add the DotNetOpenServer assemblies. To add the assemblies, open the NuGet Package Manager Console then type the following commands:
PM> Install-Package UpperSetting.OpenServer.Windows.Client
PM> Install-Package UpperSetting.OpenServer.Protocols.KeepAlive
PM> Install-Package UpperSetting.OpenServer.Protocols.WinAuth.Client
PM> Install-Package UpperSetting.OpenServer.Protocols.Hello.Client
The 'UpperSetting.OpenServer.Windows.Client' package contains the client.
The 'UpperSetting.OpenServer.Protocols.KeepAlive' package contains both the server and client Keep-Alive protocol implementations.
The 'UpperSetting.OpenServer.Protocols.WinAuth.Client' package contains the client-side Windows Authentication protocol implementation.
The 'UpperSetting.OpenServer.Protocols.Hello.Client' package contains a sample protocol that simply sends a message to the server and receives an echo response.
Step 3: From the Main function, create a US.OpenServer.Configuration.ServerConfiguration object then set any properties you want to override including SSL/TLS properties. If you copy the code below, replace the ServerConfiguration.Host value with the hostname your server is running.
ServerConfiguration cfg = new ServerConfiguration();
cfg.Host = "UpperSetting.com";
cfg.TlsConfiguration.Enabled = true;
Step 4: Create a Dictionary of US.OpenServer.Protocols.ProtocolConfiguration objects keyed by the unique protocol identifier that contains the following three protocols:
-
US.OpenServer.Protocols.WinAuth.WinAuthProtocolClient
-
US.OpenServer.Protocols.KeepAlive.KeepAliveProtocol
-
US.OpenServer.Protocols.Hello.HelloProtocolClient
Dictionary<ushort, ProtocolConfiguration> protocolConfigurations =
    new Dictionary<ushort, ProtocolConfiguration>();
protocolConfigurations.Add(WinAuthProtocol.PROTOCOL_IDENTIFIER,
    new ProtocolConfiguration(WinAuthProtocol.PROTOCOL_IDENTIFIER, typeof(WinAuthProtocolClient)));

protocolConfigurations.Add(KeepAliveProtocol.PROTOCOL_IDENTIFIER,
    new ProtocolConfiguration(KeepAliveProtocol.PROTOCOL_IDENTIFIER, typeof(KeepAliveProtocol)));
protocolConfigurations.Add(HelloProtocol.PROTOCOL_IDENTIFIER,
    new ProtocolConfiguration(HelloProtocol.PROTOCOL_IDENTIFIER, typeof(HelloProtocolClient)));
Step 5: Create the US.OpenServer.Client passing in the ServerConfiguration and the the Dictionary of ProtocolConfiguration objects.
client = new Client(cfg, protocolConfigurations);
Step 6: Call Client.Connect to connect to server.
client.Connect();
Step 7: To get a list of protocols running on the server call Client.GetServerSupportedProtocolIds. For example:
ushort[] protocolIds = client.GetServerSupportedProtocolIds();
foreach (int protocolId in protocolIds)
    client.Logger.Log(Level.Info, "Server Supports Protocol ID: " + protocolId);
Step 8: Initialize the WinAuthProtocolClient protocol then call WinAuthProtocolClient.Authenticate to authenticate the connection. If you copy the code below, replace the username/password below with your username/password.
string userName = "TestUser";
WinAuthProtocolClient wap = client.Initialize(WinAuthProtocol.PROTOCOL_IDENTIFIER) as WinAuthProtocolClient;
if (!wap.Authenticate(userName, "T3stus3r", null))
    throw new Exception("Access denied.");
Step 9: Initialize the KeepAliveProtocol to enable the client/server Keep-Alive (aka Heartbeat) protocol.
client.Initialize(KeepAliveProtocol.PROTOCOL_IDENTIFIER);
Step 10: Initialize the HelloProtocolClient then call HelloProtocolClient.Hello. For example:
HelloProtocolClient hpc = (HelloProtocolClient)client.Initialize(HelloProtocol.PROTOCOL_IDENTIFIER);
string serverReponse = hpc.Hello(userName);
client.Logger.Log(Level.Info, serverReponse);
Each of the Client constructor parameters can be set to null. If a parameter is set to null, the constructor will create an instance of the configuration object using the default property values then attempt to load the properties from the app.config file.
Step 11: Compile and run. The client/server applications should display the following output:
Server Output:
Info Execution Mode: Debug
Info Press any key to quit.
Info Listening on 0.0.0.0:21843...
Info Session [1 127.0.0.1] - Connected.
Debug Session [1 127.0.0.1] - [Capabilities] Sent Protocol IDs: 1, 2, 10
Debug Session [1 127.0.0.1] - Initializing protocol 2...
Info Session [1 127.0.0.1] - [WinAuth] Authenticated \TestUser.
Debug Session [1 127.0.0.1] - Initializing protocol 10...
Info Session [1 127.0.0.1] - [Hello] Client says: TestUser
Info Session [1 127.0.0.1] - [Hello] Server responded: Hello TestUser
Debug Session [1 127.0.0.1] - Initializing protocol 1...
Debug Session [1 127.0.0.1] - [Keep-Alive] Received.
Debug Session [1 127.0.0.1] - [Keep-Alive] Received.
Debug Session [1 127.0.0.1] - [Keep-Alive] Sent.
Info Session [1 127.0.0.1] - [Keep-Alive] Quit received.
Info Session [1 127.0.0.1] - Disposed.
Client Output:
Info Execution Mode: Debug
Info Connecting to localhost:21843...
Info Connected to localhost:21843.
Debug Session [1 127.0.0.1] - [Capabilities] Received Protocol IDs: 1, 2, 10
Info Server Supports Protocol ID: 1
Info Server Supports Protocol ID: 2
Info Server Supports Protocol ID: 10
Debug Session [1 127.0.0.1] - Initializing protocol 2...
Info Session [1 127.0.0.1] - [WinAuth] Authenticated.
Debug Session [1 127.0.0.1] - Initializing protocol 1...
Debug Session [1 127.0.0.1] - Initializing protocol 10...
Info Session [1 127.0.0.1] - [Hello] Client says: TestUser
Info Session [1 127.0.0.1] - [Hello] Server responded: Hello TestUser
Info Hello TestUser
Info Press any key to quit.
Debug Session [1 127.0.0.1] - [Keep-Alive] Sent.
Debug Session [1 127.0.0.1] - [Keep-Alive] Sent.
Debug Session [1 127.0.0.1] - [Keep-Alive] Received.
Debug Session [1 127.0.0.1] - [Keep-Alive] Quit sent.
Info Session [1 127.0.0.1] - Closed.
The complete source code for this sample application can be found here:
https://github.com/UpperSetting/DotNetOpenServerSDK/tree/master/Samples/Windows/HelloClient
Conclusion
I've shown you how you can use the open source DotNetOpenServer SDK to create smart mobile device applications that securely access data and/or business logic running in the cloud. I've provided several links that show you how to create your own protocols including how to implement your own authentication model. I've detailed how to create a Windows client/server application using the SDK and provided links to create Android, iOS, Windows Phone, Mac and Java clients.
If this SDK is of interest to you, you may want to also look at the extensions I wrote which are available in my DotNetCloudServer SDK. The extensions provide remote method invocation (RMI), variable subscriptions and event notifications. Using the DotNetCloudServer SDK you can create client applications that monitor and control hardware often seen in the automation, manufacturing and defense industries.
I hope this open source project is beneficial to the community and I welcome all of your comments. Thank you very much for reading this blog.
Michael Janulaitis
CEO